Scan Those Old Photos Before it is Too Late
I recently borrowed some old photo albums from my parents. In particular, I was interested in perusing through my baby pictures since we are expecting a baby soon and it is fun to compare baby pictures. I was amazed (and very saddened) at how yellow/red the pictures were. Aren’t just the photos of your parents and grandparents supposed to be discolored? Man, talk about making me suddenly feel old! These pictures are only 32 years old (from the late 1970s).
They were in an magnetic photo album popular during that time (the kind with the sticky pages and plastic overlays). As many scrapbookers are aware, older albums are often not acid-free or lignin-free. Acid-free and lignin-free means that the item (in this case, the album pages) has gone through a process to make sure it won’t discolor or deteriorate the photos.
So I decided that I needed to get on the ball and scan in all my photos ASAP. I may not be able to reverse the damage already done, but at least I can capture them before further damage happens. And I can do some manipulation with Photoshop to help with some of the coloration.
But I found that my photos were stuck TIGHT. I have seen a few tips online on how to remove them (including freezing the album overnight, hairdrying the pictures, manipulating unwaxed dental floss underneath the photos, and using a product called UNDO), but I haven’t tried any of these yet. In the interest of saving time, I decided to cut out each entire page and then scan each page in. I scanned them in at 600 PPI.
After scanning, I am importing the scanned pages into Photoshop and cropping around each photo and creating PSD files out of each (so I don’t mess with the original scanned file). Then, I am making repairs to the photos using Photoshop’s clone stamp tool and patch tool to help with any perfections on the photo that happened due to age or the scanning process. I also am using the Variations, AutoLevels, and AutoColor options (all found under Image/Adjustments) to help bring some color variation back to the photos. I do each change on a separate layer so I can mess with opacity and play with the different options to find the best one.
I am sure a professional could do a much more thorough and impressive re-coloration, but I have hundreds of photos to do so fast and easy is the route I am taking. I will be keeping the original scans in case I want to revisit any of the pictures’ restoration in the future. The nice thing about getting these scanned in is that they are captured “as is” and the digital file will not deteriorate even if the original photo continues to do so.
Do you have any fast and easy tips for recoloring old yellow/red photos? I would love to hear any suggestions!
My original scans are on the left with the modified/repaired photo on the right. These are of me at 1-2 months old.
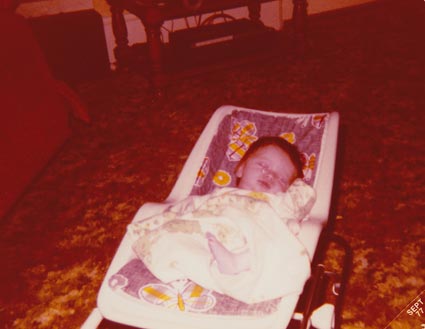
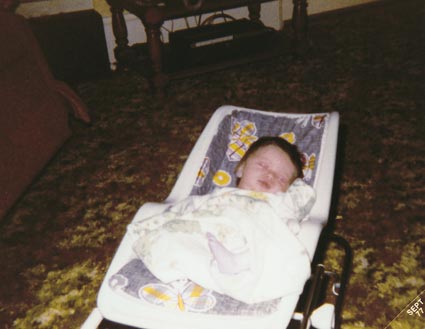
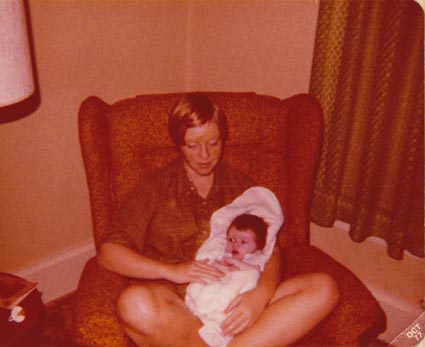
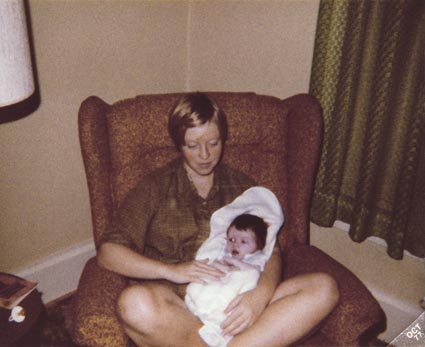
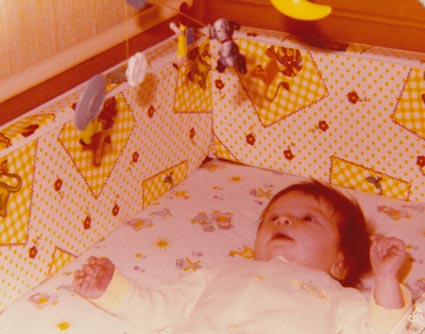
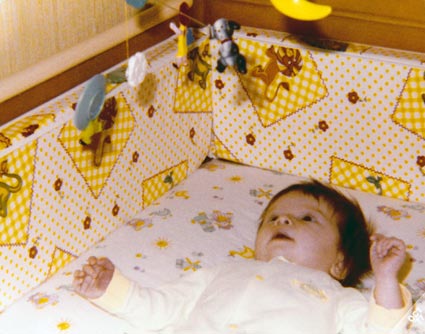
So my encouragement to you is to scan in your old photos as soon as you can, even if you don’t have time to make edits or repairs to those scans now. You won’t regret your proactive prevention of your precious photos’ further discoloration and damage since you will have a digital copy that will be saved for later repair. You can bet that I asked my mom to bring me some more albums on their next visit so I can continue scanning my valuable memories in.


Great idea. I recently inherited photo albums from my grandma. She made two albums for each of her grandkids. Have you set up actions for what you’re doing? That would make things faster, and then you can make minor adjustments if one particular action isn’t “just right”. My question is, what do you do with the original photos? And what’s your file structure once you’ve scanned your photo? Do you keep the original scan *and* have the new jpeg, or keep the psd file and replace the scan with the color-corrected photo, or…? So many choices!
You are right. I probably should create an action for this. It could at least create the new layers, prompt me to make a choice with the Variations color that I want to use, and then do the AutoColor and AutoLevels pretty easily. I may have to play with that and see if it has enough flexibility to let me do the Patch Tool and Clone Stamp in the middle of running it. Or maybe have two actions. It definitely could speed up the process!
For now, I am giving the original photos (well, the entire cut out pages) back to my mom at her request. If I were keeping them, I think I would continue to pursue options to remove them from the pages altogether and get them somewhere safer, maybe a photo box or a safer album.
As for my file structure, I am keeping several copies. First, I have the original scanned page that contains up to four photos. After I crop each photo out, I save each as a jpg (considering it also to be an “original” that I won’t touch and I also do a save as to a PSD. That way I don’t have to keep saving my cropped “original” jpg file as I make any edits and risk any digital file deterioration with the jpg.
I make all edits to the PSD file and when I am happy with the result, then I do a save as again with the same file name but “_edit” at the end so I know it is the final copy.
So I am keeping the original page scan, the original cropped photo as a jpg from that scan, the PSD file, and then the edited/final jpg file. Yikes! Although I suppose I could get rid of the original cropped jpg if I wanted to since I keep the original copy as a separate layer in the PSD file also so that I can easily revert back to the beginning.
You are right – so many choices!! But that is how I am doing it for now. I think I had better go out and get an external hard drive soon. 🙂
I think you have done a great job with correcting these photos!
Yeah an external hard drive! I was wondering if you have one of those. 🙂 It’s tough to know what I’ll need later when I save digitally. I rarely ever go back to the original after making some edits to a photo, but it’s hard to delete them. I’m pretty sure that you can pause an action to play later. It will definitely save you some time. Here are some actions that I found once upon a time that might come in handy for you sometime. http://coffeeteaphotography.blogspot.com/
I am very impressed with the corrections you have done – and very encouraged! My children were born 1975-1984; I purchased special ‘acid-free’ pocket pages, so they aren’t stuck down (although my 50’s baby pictures that I put into magnetic albums in the early 70’s are!), but many are very discolored. Before my fourth child was born, in 1984, it was already apparent that many of the photos from 5-10 years earlier were becoming discolored. What I observed was that where the processing was done had made a huge difference, even with professional protraits.
I am hoping that if I get a negative scanner (I have all the negatives for photographs) I will have less work to do, but I guess I won’t know until I try. Sounds like I better try right away!!
I totally agree with all the different versions you are saving of your photos. At one point I was making edits without saving originals; now I’ve learned much more about photo-editing, and wish I had the originals! And now I’m saving the originals, because I’m sure I still have much to learn.
Thank you for sharing your experience and advice!
Thanks for the action recommendation Amanda. Her site is one of my favorites and I have been using them on my current photos. I might have to try some of them on these old ones and see if they can help too. 🙂
I agree with you Anita; where or how the photos were processed also seems to make a difference.
Thanks for dropping by my site… i love your idea of scanning old photos 🙂 congrats on your new girl 🙂 Best Christmas present 🙂
Dropped in to see your templates. I actually have decided to use the Sepia feature in Irfanview for a lot of my older photos. Recolouring them just never looks quite *right* to me. No doubt it is operator error. LOL
Yours look great!
That’s a great idea Heather. I may have to try that on some of mine too. I have so many to do yet that it might save me a hefty chunk of time (not to mention my sanity!!) 🙂
First, you have done an excellent job on fixing these photos – so whatever you are doing is definitely working. I have been scanning my old family photos and already have literally hundreds of pics and am still only part of the way done. Many of mine are slides and negatives since my mom had put all the pics from my young years (70’s) in those magnetic albums and then threw them away because they discolored. Unfortunately, I don’t have negatives for many of them and have lost several years.
I don’t know how you are scanning (you may be far beyond me) but I got an Epson Perfection 4490 Photo scanner a couple of years ago and have found that the scanner software actually does a pretty good job. There is actually an automatic Color Restoration box to check that really does well with the old discolored pics. It’s not perfect but definitely gives a good start and takes no more time when scanning. You can adjust levels, brightness & contrast, color balance, saturation and a few other things to the preview before you do the scan. Definitely faster than having to open each one in an editing program to do the same thing. It also scans negatives and slides at pretty high res with automatic dust correction.
Like I said, you may be way beyond this but if not, maybe this could help. I tried other formats but ended up using high quality JPEG because other formats took too long and were WAY too big to fit my storage space. I scan everything into folders designated by the year I think they were taken and maybe sub folders for specific things like Hawaii vacation, etc. Hope this is somewhat helpful.
Great idea Candy. I will have to check and see if my scanner has any helpful options like that. Anything I can find to save time!!
I save my finals as JPGs and put them in folders by year also.
I stumbled on your site while looking for “goodies” for Disneyland pages for my grandchildren. Wow! I love your creations.
I just read your article on scanning old photos from albums. I had the same problem. I solved it by scanning to “preview” from my scanner and cropping each photo there. Then saving directly to my computer as individual shots. I guess it is a little more work, but I am a control freak
If you are interested, Jessica Sprague (dot com) has a class going on right now for restoring old photos. I am in it and have learned so much about fixing colors and removing the orange or yellow fade and taking out dust and scratches! I highly recommend taking the next class when it is available.
It seems like you are doing a wonderful job, keep up the good work! I do agree, scan those pics (at high resolution) before the ink further deteriorates even further.
LOL April! I am taking that class right now too and loving it. I was pleased to learn I was getting similar results with how I was editing the photos and have also learned some fabulous things too that have made things quicker and easier, such as using the Spot Healing Brush and the Dust and Scratches Filter. 🙂
Just found your blog!! I know this is a very old post, but maybe you’ll get the comment. I am in the process of scanning old photos and making scrapbook pages from them. I clean up the colors a bit with photoshop and if that does not suit me, I sometimes desaturate them, or make them black and white. I also have started duplicating the file, making it black and white and then manipulate the opacity, either the colored version on top or the black and white version. Gives it an arty flair and you get rid of those nasty colors. This also works nicely for all those red faces in modern day shots for people whose skin is not photogenic (everybody I know, for sure)
Thanks for the suggestion, Nan. I will have to try that! 🙂