How to Round Corners on your Photos in Photoshop
Back when I was a paper-scrapper, one of my favorite tools was my corner punch which I used to make rounded corners on my photos. If you were to take a look at those old layouts, I am sure it would be easy to spot just when that tool was purchased, as I began to use that thing all the time on pretty much every photo.
I still like the look of rounded corners on my digital scrapbook layouts, although I don’t think I go as crazy overboard as I did back then. 😉
Here is how to get a rounded corner on your digital photos using Photoshop or Photoshop Elements.
- To start off, I move the photo onto my scrapbook layout so that I do not change my original file.
- Select your Custom Shape Tool (Keyboard shortcut is Ctrl-U on a PC or Command-U on a Mac) and then select the Rounded Rectangle Tool option.
- Change the radius to the value you want for your rounded corners. For this example, I am using 150px. Generally, the larger the number the more rounded your corners will be. I also have “Create New Shape Layer marked” in case yours does not default to that option.
- Click and drag with your mouse to create the rectangle size that you desire. After releasing your mouse, you will have a new layer on top with your rectangle shape. In a later step, we will be using this new layer/shape as our clipping mask in the same way you would clip a photo or paper to a digital scrapbook template’s layer.
- Using the Move tool, reposition the rounded rectangle over your photo (if needed). You can also resize the width or height of your rectangle at this time (if needed). You might find it helpful to reduce the opacity of your new “Shape” layer so that you can see your photo underneath when doing your repositioning or resizing.
- Change the opacity of the shape layer back to 100% if you changed it in the previous step. (Important!)
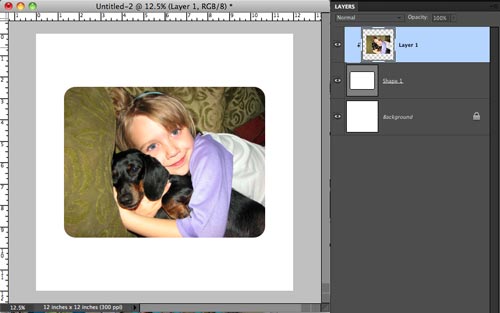
- In your layers palette, move the “Shape” layer to be directly BELOW your photo that you want the rounded corners on.
- Select your photo layer in the layers palette to make it the active layer.
- Now you are going to “clip” your photo to the Shape layer. For Photoshop Elements users, this is a CTRL-G (Command-G on a Mac). For Photoshop CS users, this is a CTRL-Alt-G (Command-Option-G on a Mac). Or alternately you can go to your Layer menu and choose “Create Clipping Mask”.
- You now have a photo with beautifully rounded corners. You can merge the photo layer and the shape layers together if you desire.


These instructions can also be used to create a complimentary paper matte for your rounded-corner photo.
You can really get creative with your rounded corners in your digital scrapbook layouts. I will have an example in an upcoming future post. 🙂


Great tutorial – very clear step-by-step instructions – thank you for sharing this!
What version of photoshop elements is this done on? I have 11 and can’t find and can’t find the tools that I am finding on here. Thanks for your help!
Sincerely,
TOTALLY CLUELESS