Tutorial: Convert a 12×12 Template to 8.5×11
Today I’d like to share a tutorial with you on how you can change a 12×12 template to 8.5×11. In fact, I am going to share two different ways to do the conversion.
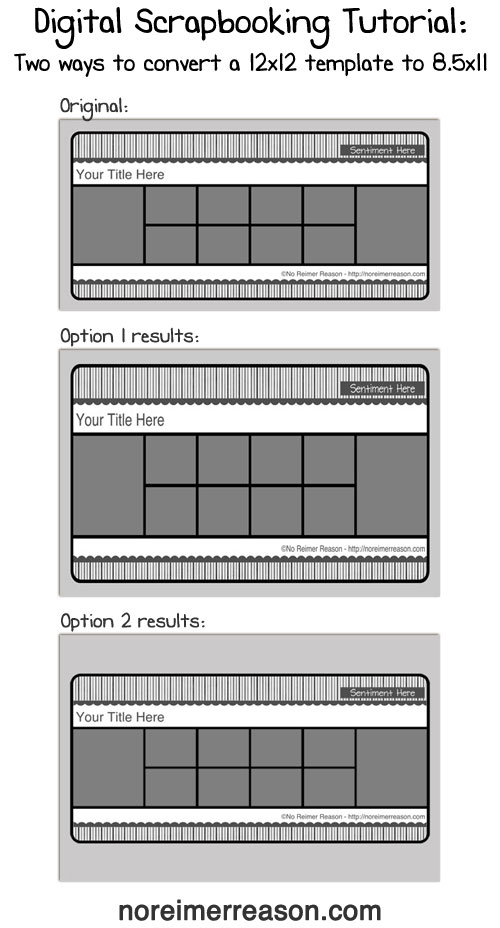
This tutorial was created in Adobe Photoshop but it should be pretty similar in Photoshop Elements. Here is the 12×12 template we will be working with.

Template Size Conversion Option #1
Step 1: Open your 12×12 layout and do a “Save as” so that you are working with a copy rather than your original file.
Step 2: Go to Image/Image Size.

Step 3: Change the Document Size to 8.5″ for Width and 11″ for Height. Make sure the Constrain Properties checkbox is NOT checked. Click OK. (NOTE: If converting a two-page template like in my example, the width should be 17″, which equals 8.5″+8.5″)

Step 4:And DONE! So simple and easy. You will see that the template’s shapes do resize slightly using this method. (The photo boxes are narrower because the overall layout was updated to be narrower.) For this reason, do not attempt these steps with a completed layout or your photos would get distorted. But for a template, it is no problem.

Template Size Conversion Option #2
Step 1: Open your 12×12 layout and do a “Save as” so that you are working with a copy rather than your original file.
Step 2: Go to Image/Image Size.
Step 3: Change the Document Size to 8.5″ for Width and 8.5″ for Height. Click OK. (NOTE: If converting a two-page template like in my example, the width should be 17″, which equals 8.5″+8.5″. The height would still be changed to 8.5″.)

Step 4: Go to Image/Canvas Size. Update the height to 11″. Click OK.

Step 5: Your canvas will now be 8.5×11. Since we’ve changed the canvas from a square to a rectangle, you will now see some transparent places in the template.

Step 6: Go to the background layer in the layers palette and fill the entire background with the original background color.

Step 7: And DONE! In this example, you will notice that the shapes from the original template maintain their original sizes in relation to each other. This is because we initially changed the template from 12×12 to 8.5×8.5, therefore keeping the original square of the layout. However, once we then elongated the height to 11″, the background now contains more white space. Since this is a template, feel free to resize or move any of the shapes to fill up the extra space or you can leave it as it is.

Here are the final results:
I hope this helps you on your scrapping journey. It should also open up a bunch of options for those 8.5×11 scrappers who have a hard time finding templates in their preferred scrapbook size!

Welcome Back! And Thank you for the tut on resizing!
Thank-you so much for this tutorial. It certainly will make my 8.5 X 11 scrapbooking life easier.
Blessed be.
🙂