January in Review
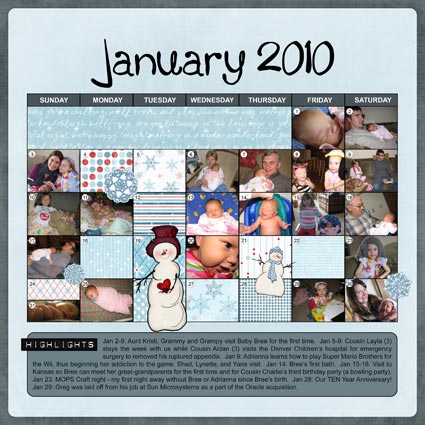
I saw someone post a layout of pictures in a calendar format and I fell in love with it instantly. My mind began thinking on how I could make a template for it when I saw that she had linked up a template that she had purchased and used to make the layout. I went out and bought the template pack that night and I have to say that it is fabulous! Everything is on its own layer so it is very easy to customize.
Here is what I did with the template.

Credits: Template by Misty Cato “Month in Review 2010 Calendar Templates”, Papers by Martine McKnight “Winter Wonderland”, Snowmen by Digital Anemona “Christmas Gift”
I enjoyed making this layout so much that it almost makes me wish February would hurry up and get over so I can start on my February month in review layout. 🙂


Okay I’m SOOOOOO excited about this template set I can’t even stand it. I just went & purcahsed it to! 🙂 Thanks for sharing. Here’s my question for you because I’m still SO new in Photoshop. How do I get my photos to fit in the box size specified in the template w/out distorting the photo itself? Thanks for all your awesome ideas and tips! 🙂 How’s the family and the new job for Greg?
Hi Michelle,
Isn’t that a great template set? I am already looking forward to doing February’s now. I wonder if she has one for 2009 so can go back and do it for last year too. hehe.
The first thing you will want to do is clip (CTRL-G) the picture to the box layer that you want it to go into. To make sure your photo doesn’t distort, hold down the shift key when resizing. Or, in the bar above where it shows the width and height of the photo (it starts at 100% for each), click the “link” icon between them so that when you resize they both remain an equal percent. The shift key/link icon is the key to your photo not distorting when resizing.
One thing I found is that my pictures were so much larger than the little box that they will be resized down into that sometimes I would change the image size first before moving it into my template. I wouldn’t change it to the exact size of the box because then positioning would be trickier. I simply scaled it down it to where it wasn’t quite so huge when I moved it onto the template and then clipped the layer and did the repositioning and final resizing as needed. To change the image size before dragging onto your template, go to Image/Image Size and change the width. Make sure the “Constrain Proportions” checkbox is marked so that the height and width change equally. Also be careful not to save the changes made to your photo size.
I hope that is what you were looking for. 🙂
We are so excited that Greg got a job so quickly. I hope he enjoys this new position. I believe he will eventually be working on their main website, which is pretty awesome.
Bree actually slept for a four hour stretch last night, which is a new thing. I actually had to wake HER up to nurse in the early morning hours. I hope this continues. I could sure use the rest. 🙂
Amber
Hello Amber!
First, this layout is so cute! I also really like your pictures 🙂
And then second, I just wanted to tell you that I used one of your templates (no. 35) to create a quickpage. I published it on deviantart.com (http://ella-hippyhoppy.deviantart.com/art/FB-Addicted-QPs-154823987) and on my blog (http://ella-hippyhoppy.blogspot.com).
I hope that’s ok with you!
Thanks for letting me know, Lisa. The QP looks great. Thanks also for the link back to the template – I really appreciate that. 🙂