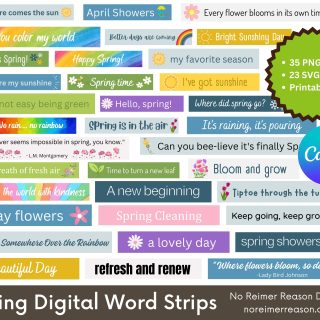
9/3/2010

Examples of Scrapbook Layouts with Rounded Corners

Filed under: — No Reimer Reason @ 9:22 pm

In my previous post, I had a tutorial on one way to achieve rounded corners on the photos in your digital scrapbook layouts. Today I would like to give a few scrapbook layout examples that use rounded corners not only on the photos themselves but also on papers or a grouping of papers. This is a trick I use often on my own layouts. Sometimes it is nice to not be so square. :)


Credits: Scraplift of a layout by Denise Gormish found here, Kit is Kristen Cronin Barrow and Scrapkitchen Designs – A Mother’s Love

Mickey Mouse Scrapbook Layout
Credits: Kit and QP are both FREEBIES designed by me and available for download on my Digital Scrapbook Freebies Page.

Pumpkin Patch Scrapbook Layout

Scrapbook Layout
Credits: Kit is “Just Us Girls” by RK Designs

6/22/2010

Father’s Day Card Idea

Filed under: — No Reimer Reason @ 9:40 pm

I ran across an awesome idea for a Father’s Day card at C.R.@.F.T (Creating really awesome free things) and I just had to copy it for my card to Greg this Father’s Day. I really like how it turned out. I did my best to layout and design the card as if it were an actual Google search. Of course I did it digitally and then printed it out. :)

Here is the front of the card:
Fathers Day Card Idea

Then you flip the card over for your search results:
Fathers Day Card Idea

In the “Sponsored Links” section I hand wrote a personal message to Greg after printing the card out.

12/6/2009

Scan Those Old Photos Before it is Too Late

Filed under: — No Reimer Reason @ 11:37 pm

I recently borrowed some old photo albums from my parents. In particular, I was interested in perusing through my baby pictures since we are expecting a baby soon and it is fun to compare baby pictures. I was amazed (and very saddened) at how yellow/red the pictures were. Aren’t just the photos of your parents and grandparents supposed to be discolored? Man, talk about making me suddenly feel old! These pictures are only 32 years old (from the late 1970s).

They were in an magnetic photo album popular during that time (the kind with the sticky pages and plastic overlays). As many scrapbookers are aware, older albums are often not acid-free or lignin-free. Acid-free and lignin-free means that the item (in this case, the album pages) has gone through a process to make sure it won’t discolor or deteriorate the photos.

So I decided that I needed to get on the ball and scan in all my photos ASAP. I may not be able to reverse the damage already done, but at least I can capture them before further damage happens. And I can do some manipulation with Photoshop to help with some of the coloration.

But I found that my photos were stuck TIGHT. I have seen a few tips online on how to remove them (including freezing the album overnight, hairdrying the pictures, manipulating unwaxed dental floss underneath the photos, and using a product called UNDO), but I haven’t tried any of these yet. In the interest of saving time, I decided to cut out each entire page and then scan each page in. I scanned them in at 600 PPI.

After scanning, I am importing the scanned pages into Photoshop and cropping around each photo and creating PSD files out of each (so I don’t mess with the original scanned file). Then, I am making repairs to the photos using Photoshop’s clone stamp tool and patch tool to help with any perfections on the photo that happened due to age or the scanning process. I also am using the Variations, AutoLevels, and AutoColor options (all found under Image/Adjustments) to help bring some color variation back to the photos. I do each change on a separate layer so I can mess with opacity and play with the different options to find the best one.

I am sure a professional could do a much more thorough and impressive re-coloration, but I have hundreds of photos to do so fast and easy is the route I am taking. I will be keeping the original scans in case I want to revisit any of the pictures’ restoration in the future. The nice thing about getting these scanned in is that they are captured “as is” and the digital file will not deteriorate even if the original photo continues to do so.

Do you have any fast and easy tips for recoloring old yellow/red photos? I would love to hear any suggestions!

My original scans are on the left with the modified/repaired photo on the right. These are of me at 1-2 months old.

Original Repaired / Edited

Original Repaired / Edited

Original Repaired / Edited

So my encouragement to you is to scan in your old photos as soon as you can, even if you don’t have time to make edits or repairs to those scans now. You won’t regret your proactive prevention of your precious photos’ further discoloration and damage since you will have a digital copy that will be saved for later repair. You can bet that I asked my mom to bring me some more albums on their next visit so I can continue scanning my valuable memories in.

9/25/2009

Simplifying Scrapbooking Using Project 365

Filed under: — No Reimer Reason @ 8:11 pm

If I look only at my progress in taking at least one photo a day for the Project 365 resolution, I have to admit that I have failed. Miserably. I have gone through a range of ideas of what to do to salvage the project in my mind.

After my deliberation, it all came down to this: Do I continue with my original idea of making a separate scrapbook album of the Project 365 photos, showing a nice snapshot of our year even though there won’t be a photo every single day? Or do I just give up altogether and just be glad for the extra photos to fill my albums that I might not have taken otherwise?

Option 1 still seemed like a good option, although it would end up being a much smaller album than originally planned. Option 2 seemed a bit daunting at first. Sure, I am thankful for the extra photos but that also means EXTRA scrapbook pages to create, and goodness knows I am already behind on scrapping my photos. So I decided on a mix of the two.

I decided that I would continue scrapping my “photo-a-day” photos, making one layout for the week of photos. Or sometimes 2 weeks to a layout since I didn’t get an actual photo every day. But, instead of having these layouts be placed in a separate album, I will place them into my regular album. My albums are in sequential order, so they will simply be placed in order like any other layout.

After I made this decision, I began to realize how free-ing this will be for me. Here’s why:

  1. Even without considering the Project 365 photos, I often have a lot of photos where there is only 1 shot of an event or day. But if I still continue to scrap layouts that are a week’s compilation of one photo per day, it would be an easy way to get many of them scrapped and journaled without feeling the pressure of making up to 7 layouts that consist of just 1 or 2 photos each.
  2. Sure, the photos won’t be of the same event or same subject matter, but they won’t be expected to be since they will still be part of the Project 365 layouts.
  3. Without the pressure to complete so many separate layouts for the extra photos that don’t have a “place” or a special memory to warrant their own page, I will *maybe* catch up on my scrapping for the year. (haha, if only!)
  4. I will still get that snapshot of our everyday lives with these layouts, which is what I was hoping for.
  5. I am keeping my Project 365 layouts very simple. Uniform background. Simple titles stating the week and dates. Photos. Simple journaling for each photo. I often reuse the same templates and just flip them. Quick and EASY!!

Example:

Some of these photos are ones that I would have wanted to include in my scrapbook album even though I only had 1 from the event. But instead of having to make several 1-photo layouts, I can make ONE multi-photo layout of our week, including journaling. In doing so, I also capture a snapshot of our week in some of the other photos that might not have normally been deemed “scrap-worthy” even though I am glad to be able to look back at them now with this layout and still remember what was going on in our lives.

After getting started with this idea, I have been able to scrap 2 months worth of photos in less than 1 month. This includes my regular layouts and the ones that I put onto my Project 365 layouts. Hooray!

How are you doing with your Project 365 goals, photos, or layouts?